Archive | October 2014

Pumpkins and seeds!

Hey y’all! We are all aware what time of year it is and that’s pumpkin season! Halloween is right around the corner!! Are you as excited as I am? I know I did a pumpkin post earlier but I could not help myself and had to carve a pumpkin! This was actually my first time carving a pumpkin by myself. Normally my Dad does everything and I watch and call it “helping” (: Not only did I carve the pumpkin I decided to save the seeds instead of trashing them! I have never had pumpkin seeds before and thought I should bake them and try them out. I know I’m straying a bit when I go into how to bake pumpkin seeds but I did pull the guts out when I carved the pumpkin so it’s all tied together! I also thought some of y’all would enjoy a little mix up!

What you will need to carve your pumpkin:

  • Trash bag
  • Knife or pumpkin carving knives if you wanna be fancy(:
  • Pencil or pen to draw out what you want to carve
  • OR you can print out a stencil!
  • Scoop
  • Tea candle and match
  1. Lay out a trash bag so you keep a mess free area. What we did fist was cut the top! My Dad says the best way to cut the top it to make a circle except for one end, you form a half square before you finish off the circle because then you’ll have an easier time finding how your lid fits when you’re taking it on and off! You also want to carve at an angle because if you do it straight up and down your lid could just fall right through.
  2. Next you’re going to need to scoop all the guts out! You can either use a scoop or you hands. We used our hands. Save your seeds!!!!
  3. When your pumpkin is completely empty you can draw or stencil the image you want
  4. Carve it!

pumpkin


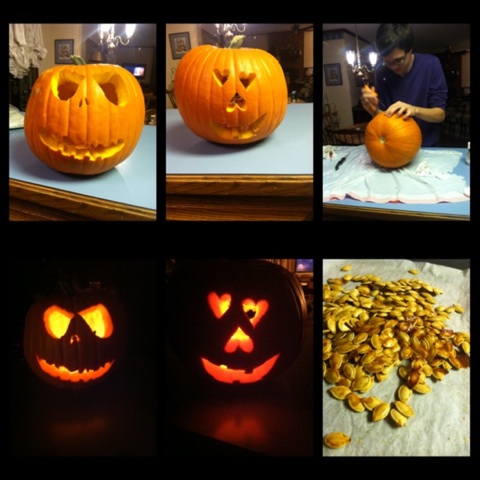
My boyfriend and I carved the pumpkin together. He did his own side though! I don’t recommend carving two sides of a pumpkin! Sadly, the wind goes right through it and blows your candle out):

Baking your seeds and what you will need:

  • Strainer
  • Dish towels
  • A bowl
  • Pan
  • Parchment paper
  • Brown sugar
  • Vanilla extract
  • Olive oil
  • Salt

Preheat your oven to 350

  1. Fist you want to rinse your seeds off and get rid of all the pulp. It’s super easy and quick
  2. Next you want to dry your seeds off as much as possible. I laid the seeds out on a dish towel and then put another on top and just pressed on them till they weren’t soaking wet anymore. Don’t use paper towel because then you’ll have paper stuck to your seeds.
  3.  Next you’re gonna put your seeds into a bowl and add your ingredients. A table spoon of brown sugar, olive oil, and vanilla extract. Mix everything up!
  4. Now you are going to lay out the parchment paper over the pan and then lay out your seeds onto the paper. Try to get them all flat and none on top of each other.
  5. Sprinkle with salt! Then bake them for about 20 minutes. You will know when your seeds are done and ready to eat when they are a nice caramel brown color! Yummy(:

Hope you enjoyed this post and try baking some seeds! Mine tasted like caramel popcorn a bit! I was surprised with how much I actually liked them! The ingredients are really to your discretion, depending on how many seeds you have and what not. The amount I posted above was the amount I ended up using. It’s really easy to eyeball how much you will need!

This entry was posted on October 25, 2014. 1 Comment

Perk up your candle(:

candles glitcandle

This craft is super easy and a lot of fun. It’s for all ages and can be a bit messy! This is a great thing for gifts. I love crafts that can be gifts for people because it’s nice to hand decorate something for someone! I know grandparents love this kind of stuff!

What you will need:

  • Candle! (Get a scent you will love cause you’re going to decorate it in you own special way)
  • paint
  • paint brushes
  • glitter tape
  • stickers
  • whatever you want to use

With this craft you have the ability to use whatever you can think of to dress up your drab boring candle.

I used glitter tape, paint, and glitter paint spray because I wanted to keep mine decorated but simple.

I hope you have fun decorating!

This entry was posted on October 19, 2014. 1 Comment

Design your own jewelry box

This craft is NOT something you would do with kids due to the tools you are using to design your wooden box.

What you will need:

  • A wooden box of your liking
  • A pencil
  • A wood burner

You can find a wooden box all around at any store. I picked one from Michael’s Arts and Craft Store. I picked a small little box to hold earrings in my purse because I’m really good at losing them.

Finding a wood burner is really easy, you can find them at Michael’s Arts and Craft Store as well, they range from 12.99-16.99.

So what you wanna do is sketch out the design you would like to put on your box, unless you’re super talented and have the ability to free hand it! I do not have that talent so I sketched out what I wanted to do. I also advice sketching out what you would like to do first because the wood burner does get extremely hot and if it gets too hot you’ll have to stop what you’re doing and come back to it when it’s cooled down a bit.

To start, plug in your wood burner and let it heat up. When you think it’s hot enough take a scrap piece of wood and test it to see if it has the ability to burn the wood yet. When using this tool you are literally burning wood into the design you are achieving.

burn

When you go to use the wood burner you want to hold the point of your tool on the wood and let it burn the wood and slowly move it across the surface into your design. It is a slow process but it will come naturally to you. The harder you press and the slower you go, the thicker the line will be.

With the wood burner you can buy different tips so that you can create the look you want. The tips range from a sharper tip to a more round, bigger tip.

When you’re done you will have a really awesome and natural looking box.

You can also use a wood burner to create signs. My boyfriend made really awesome signs for his sisters wedding over the summer and was able to do so from using a wider and rounder tip with the wood burner. So have fun with this!

Here’s the finished product:

cool

Remember to be safe and don’t burn yourself!

This entry was posted on October 19, 2014. 2 Comments

Word picture art


relax

I loved doing this craft! It was tons of fun and it’s super easy and creative.

What you’ll need:

  • A camera
  • Window mat
  • Poster-board
  • Paper
  • Plastic slip
  • Double sided tape

1.With your camera go out and take pictures of things that make letters! Whatever you can find that looks like a letter just take a picture of it. The more variety the better!

A

2.When you get all the letters of the alphabet or the letters you need for whatever word you’re making go get your pictures developed!

3. Tape the paper color of your choice to the poster-board and then tape your letters down onto the paper into the word you are creating.

4. Then put your frame on top, again using the tape.

5. After you’ve secured everything together, place your masterpiece into a plastic slip to protect it and then mount it!

This craft is great for decorating a room or giving a gift to a friend!

This entry was posted on October 19, 2014. 2 Comments

Make your own butterflies and flowers

With crepe paper you have the ability to make really pretty butterflies and flowers. Once you have created them you can attach them to string to hang across your wall or even a mobile to hang over something.

The materials you will need are:

  • Crepe paper
  • String/flower wire
  • Scissors
  • Acrylic paint
  • paint brushes
  • permanent markers
  • Stapler

Steps for butterfly:

  1. Cut out the butterflies from the crepe paper. You might want to practice on regular paper first. What you will be cutting is a diamond top connected to a circle so that when you fold it in half it looks like a butterfly.
  2. After you fold you will have to scrunch the circle to the point where the diamond and circle meet to get the bottom wing look you want. Then fold in the point of the diamond at the top toward the center where you scrunched the bottom of the wings.
  3. Secure the center of the butterfly with string or wire.
  4. Smooth out the paper to perfect the butterfly image you are trying to get.
  5. Now you can decorate your butterfly however you would like.
  6. Let them dry!

Flower steps:

  1. Lay out your paper
  2. Fold your paper in half in a hot dog style.
  3. Keep folding until you get a very skinny long folded paper
  4. Fold it in half so that the top and bottom end meet and its length is in half.
  5. Staple the paper together about half an inch from the bottom
  6. Starting from the top to the bottom fan out your paper to form a flowered look
  7. Adjust the petals by pulling them outward from each other
  8. You can add some color to them if you would like with the markers and paint or leave them be.

Once you have created your flowers and butterflies you can attach them you string to string across your room or to hang them in a window.

This craft looks really pretty in the end once you attach them all together. A little girl I babysat had a decoration like this in her room and I always loved how cute it looked!

Hand paint your pillows!

This is a super fun craft for absolutely any one! Painting a pillow is a great way to decorate your room, make something for a friend, a grandparent, aunt, uncle, or anyone. With this craft you can really range how you are decorating the pillow. You could make it decorate to use as a throw decorative pillow in the living room!

This craft could be pretty messy depending on who you’re doing it with. Just for safe measure I would place newspaper on the table if you’re doing it inside.

What you will need varies! You can either use a plain pillow with the color of your choosing or you could also use just a regular pillow case. It is all to your discretion.

You will also need:

  • Paint brushes
  • Fabric paint
  • Paint stamps (optional)

If you’re using colored pillows or pillowcases lighter colors may be more easy to use if you’re picking dark colors but if you are using a dark pillow or pillow case light colored paint would look pretty rad on it!

Once you’ve gather your materials start the creativity!


Monogram yourself with chevron

monogram

My friend made me this canvas monogram for me! I am currently working on one of my own for a friend but it is not finished and it’s a surprise so I am not posting pictures of it or the process because I don’t want to give it away in case she checks my posts out ^-^ sorry!

This craft is a bit messy so you will want to put down newspaper so you don’t make a mess on anything important!

What you will need for this project:

  • Canvas (size of your choice!)
  • Ruler and a pencil (a graphite pencil will be easiest to use but a regular pencil is doable)
  • Paint colors of your choice
  • Big paint brush to fill the canvas and small paint brush
  • Your item choice to attach to your canvas to hang it

First you will paint your canvas the color you want your background to be of your chevron. Do not forget to paint the sides of your canvas as well. If it is being hung you will see the edges and if they are not painted it will look a bit odd!

After you paint your canvas wait for it to dry. It all depends on how much paint you used for the dry time. Once your paint is completely dry take your ruler and pencil and start making your lines for the chevron pattern. Be absolutely sure the paint is dry because if you start to draw the lines and the paint is not dry it will take the paint off. While you are making your lines also make sure you are making the lines very faint, you only need the lines as your guide to paint the pattern so if they’re too dark they’ll show and that’s not really the look you want.

When your lines are finished take the color of your choice and a thin paint brush and go over your penciled lines with that color. After you have outlined the lines with paint, fill them in! Just be careful and stay in the lines. Once you have finished your pattern wait for it to completely dry again.

When your paint is dry take your pencil and make whatever shape your prefer as long as the monogram fits in the center. Paint in whatever you’ve picked and once that has dried add the monogram in whatever style you like, whether it is cursive or print.

Once everything is dry take the item you have decided to use to hang your canvas and attach it! Once you have done that you are all ready to give your gift to a friend or style up your room!

You don’t have to make a shape as it is in the picture, it’s just the way my friend did it and I like how professional it looks in the end. There is tons of creativity you can put into this so I hope you have fun with it! I’ve seen people put their home state in the center or sorority letters, so have fun with it!

Hope you have a lot of fun with this!

This exists?!

Since I  have joined a sorority and I’ve started to learn the importance of crafts and the tools that come with them. The sorority sisters are always talking about the things they have made and flashing pictures of their gorgeous Lilly Pulitzer printed paddles and letters at me. The first thing that comes out of my mouth is how on earth did you paint that?! I have been answered with a laugh, a look like I am an alien, or a mischievous smile and the word Mod Podge.

So I am pretty new and clueless with some of these crafting terms and tools but I have learned that Mode Podge will probably be my best friend due to my lack of ability to draw or paint.

Mod Podge is extremely convenient  and versatile. It is a clear adhesive that can be used to glue something down in a scrapbook or glue something down and then put the Mod Podge over it as a sealant. It can be used with paper, fabric, or whatever you need really, to just about any surface. There is even different types for the look you are going for! There is a glitter one!!!! (Eek!!!!) Click here to see!

Here’s a website that can answer any questions on this wonderful crafting tool!

I hope to show you my Mod Podge abilities in the near future (:

This entry was posted on October 1, 2014. 1 Comment