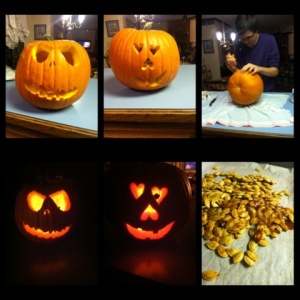
Hey y’all! We are all aware what time of year it is and that’s pumpkin season! Halloween is right around the corner!! Are you as excited as I am? I know I did a pumpkin post earlier but I could not help myself and had to carve a pumpkin! This was actually my first time carving a pumpkin by myself. Normally my Dad does everything and I watch and call it “helping” (: Not only did I carve the pumpkin I decided to save the seeds instead of trashing them! I have never had pumpkin seeds before and thought I should bake them and try them out. I know I’m straying a bit when I go into how to bake pumpkin seeds but I did pull the guts out when I carved the pumpkin so it’s all tied together! I also thought some of y’all would enjoy a little mix up!
What you will need to carve your pumpkin:
- Trash bag
- Knife or pumpkin carving knives if you wanna be fancy(:
- Pencil or pen to draw out what you want to carve
- OR you can print out a stencil!
- Scoop
- Tea candle and match
- Lay out a trash bag so you keep a mess free area. What we did fist was cut the top! My Dad says the best way to cut the top it to make a circle except for one end, you form a half square before you finish off the circle because then you’ll have an easier time finding how your lid fits when you’re taking it on and off! You also want to carve at an angle because if you do it straight up and down your lid could just fall right through.
- Next you’re going to need to scoop all the guts out! You can either use a scoop or you hands. We used our hands. Save your seeds!!!!
- When your pumpkin is completely empty you can draw or stencil the image you want
- Carve it!
My boyfriend and I carved the pumpkin together. He did his own side though! I don’t recommend carving two sides of a pumpkin! Sadly, the wind goes right through it and blows your candle out):
Baking your seeds and what you will need:
- Strainer
- Dish towels
- A bowl
- Pan
- Parchment paper
- Brown sugar
- Vanilla extract
- Olive oil
- Salt
Preheat your oven to 350
- Fist you want to rinse your seeds off and get rid of all the pulp. It’s super easy and quick
- Next you want to dry your seeds off as much as possible. I laid the seeds out on a dish towel and then put another on top and just pressed on them till they weren’t soaking wet anymore. Don’t use paper towel because then you’ll have paper stuck to your seeds.
- Next you’re gonna put your seeds into a bowl and add your ingredients. A table spoon of brown sugar, olive oil, and vanilla extract. Mix everything up!
- Now you are going to lay out the parchment paper over the pan and then lay out your seeds onto the paper. Try to get them all flat and none on top of each other.
- Sprinkle with salt! Then bake them for about 20 minutes. You will know when your seeds are done and ready to eat when they are a nice caramel brown color! Yummy(:
Hope you enjoyed this post and try baking some seeds! Mine tasted like caramel popcorn a bit! I was surprised with how much I actually liked them! The ingredients are really to your discretion, depending on how many seeds you have and what not. The amount I posted above was the amount I ended up using. It’s really easy to eyeball how much you will need!
